Wednesday, October 30, 2013

Catawba River Antique Mall Booth

Amongst the many other projects I am currently pursuing, I also took on a 10x10' booth at the Catawba River Antique Mall. I pushed to complete the booth construction before the soft opening on October 17, while also balancing the market booth install for Dixie Seating Co and the windows for Sozo Gallery. I'm really happy with how it turned out! Here's a peek into the progress of construction. Now to just keep it full of items for sale…

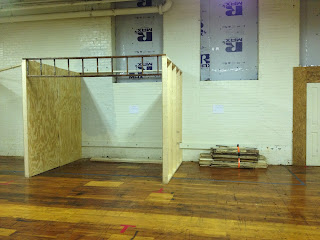
The stack of pallet wood and space on the right is my booth!

First wall is complete! Luckily I'm sharing a wall with a neighbor and they were wonderful enough to construct it and allow my to attach my pieces.

Framing the right wall. 

Right frame is complete, now for the details!

I purchased antique windows from a small shop in Thomasville, GA back in college. They've finally been put to use!

Structure set for window inserts.

Wall installed, thanks to my Mr.'s help propping things during his lunch break.

I had a ton of extra painted wood left from the Dixie Seating Co booth, and since it's my favorite color, I couldn't not use it!

Finishing off the edge.

Edge & window insets are done!

Top braces and roofing for a finishing touch!

I managed to move a few items in on Saturday. The white pallet dish rack sold within 4 hours! I'll be adding more items on Friday and in the future- expect to find vintage, antique, repurposed and handmade items in my booth! The grand opening celebrations starts this Friday at 4pm. Festivities start at 10am and run all day Saturday- including an outdoor market, fresh lunch by Tin Kitchen, and a bounce house!

Tuesday, October 15, 2013

Sozo Gallery Window Display


I had the wonderful opportunity to connect with Hannah Blanton in April this year, helping to plan and coordinate an installation for the Carolina Art Soiree, which she chairs. Hannah is an inspiring individual, full of energy and passion. She is opening a gallery in the Hearst Tower in uptown Charlotte and reached out to me again to get involved. I spent the last two days in her space working on a window display, helping with placement of art pieces and installing some drapes for color and emphasis. The artists she's representing have beautiful pieces exhibited and new work will rotate every 6 to 8 weeks.

The opening reception is Thursday from 5:30-9pm with wine and live music. Stop by to check it out! Visit the site for more information about the artists and Hannah.

I wanted to share some sneak peeks into the prep of the window. We were working within a very short timeline and small budget for this window, so some ingenuity with an easy material and composition was necessary to create a compelling display. I used basic acrylic craft paint and this amazing handy tool often used for stencils, but perfect for polka-dots. 

I traced the negative space (a circle) on the outside of the window, and highlighted it with tape, so I could easily see the outline

 I proceeded to "pounce" paint on the window!

Close up of how perfect the dots are thanks to those pouncers! 

 We wanted to work with the predominant colors in the art while also incorporating a seasonal color theme. To give a level of sophistication and control, we created a gradient and allowed the colors to fade out and become less dense the further they were from the center point.

The finished window! 


Monday, October 14, 2013

Dixie Seating Co. Market Booth

Last week was a busy week of installing a booth for the furniture market in High Point for the Dixie Seating Company! They shared a sneak peek of the construction and a simple how-to based on some display I designed for the space. Check it out here.

Monday, August 5, 2013

Engage!13 Paper Cut Wedding Dress

I had the incredible fortune to be asked to create a paper wedding dress for Engage!13 at the Biltmore Estate. It was to be inspired by Cornelia Vanderbilt, who's wedding reception was hosted at the Estate in the 1920's. The dress was on display for the grand Great Gatsby-esque Gala on the last night of a several day conference. Emily Chidester was wonderful enough to tag along and document the process and final installation of the dress! 


The event space was incredible to see and it was so exciting to be a part of the set up for such a grand evening! Check out this video that captures some of the magic or this one!

Sunday, July 21, 2013

street art inspiration

I'm currently gearing up for one of my largest freelance projects yet. I am so excited about this opportunity, and the freedom I have within the given direction, but I'm also a little intimated by the scale and installation itself. I have actually been asked to create a few installations within a kids' bonus room. The intimidating part is a large wall mural inspired by Mr. Brainwash. So, I've been heavily researching and prepping images and ideas these past few weeks. While the inspiration, and likely direction, is very specific to the client's desired aesthetic, I've stumbled across a few images that make me melt a little. I wanted to share them with you! What makes you melt at it's site?


Holly Dolly
Would this not be dreamy behind your headboard?

source
I love the feminine & detailed line-work, as well as the teal in this!

Hubby and I stumbled upon this one while honeymooning in San Juan, Puerto Rico. 

Sunday, July 14, 2013

a little bubbly in a sparkly glass

I was a co-maid of honor for my dear friend's wedding. To make sure she felt as super special as she truly is, we planned a sparkly evening of festivities for her bachelorette! I can't wait to share photos with you of the fun that ensued, but for now I have some fun little projects I created for the night. Inspired by my mother's work I painted the bride, and each bridesmaid a special glass, of course marked with their initial to be sure we knew who's was who's!

Have a variety of paint bush sizes at the ready! I like working with smaller brushes, because it is easier to control, or rather, squiggled less of a mess for me to later correct.

You can find Gloss Enamels at Hobby Lobby, or most craft stores. There are other brands available, just be sure to read the directions for baking or curing the glassware. There are some available that require it to sit for 21 days before using! Gloss Enamels can bake in less than an hour in your own oven.

Chose a font and print out the initial you wish to paint. Cut it into a small piece that will fit into the glass.

Tape paper to the inside of glass, making sure it's positioned straight before you start painting. You can just trace the printout with the paint.

Make sure to keep you brush wet before dipping in paint, this will help for a smooth application on the glass.

Dip only the tip of the brush in paint, you do not want globs.
 
I lined the top rim of the glass, to finish it off. 

I coated the base and stem as well, this took two applications to make sure it wasn't streaky.

It's looking good, but not quit done! I think some polka-dots will do the trick!

Using a flat round cylinder object, such as an eraser, is perfect for the little detail!

Gently press it against the glass. You may need to twist it slightly as you pull away, to keep the edges crisp and clean. I alternated between silver and black dots.

Let the glass dry a bit before handling. You can place multiple on the oven rack, just make sure none are touching! Follow the paint's label instructions for baking. 

Check back, and I'll have some final shots to share of our festive setup to celebrate my friend and her soon-to-be nuptials!